Sir Pompadour fancies himself quite the treasure hunter, so when the Skeith heard about the riches of Maraqua, he headed out right away. What he didn’t realise, though, was that it was sunken treasure. Sir Pompadour thinks it would be a crime to get his gorgeous head of hair wet, so he has enlisted the help of some Maraquan Petpets to do the dirty work and fetch his treasure for him.
So it seems you’ve come across my Petpet Plunge guide! Welcome and I’m glad to see you here. Most everything is self-explanatory, but if you have any comments, questions or suggestions please don’t hesitate to Neomail me. Also, don’t forget to check out the link back section if you found this guide helpful.
First Thing’s First
Do yourself a favor and adjust the game quality to whatever is appropriate for your computer. We don’t want Sir Pompadour’s treasure hunt to be bogged down by lag! The next thing to do is turn off the sound and music on the main menu. Those are the two buttons below Instructions. After that, we’re ready to play! Almost… At the beginning of each game we need to turn the effects off via the toggle effects button during game play.
Keep in mind, these are all just suggestions to help your game run at optimal performance. If you have a nice computer, feel free to leave them on. Some people like the music, effects and such.
Tips
- Click on the Petpet to point it in the desired direction, then drag to set the strength of your shot. The bigger and longer the arrow, the stronger your shot will be. (Hint: you can drag it outside of the playing field and possibly outside of the game window depending on your browser and operating system.)
- Collect all the items to advance to the next level. If you collect all the items in one shot, you earn a special bonus. The less shots you use, the more points you’ll earn.
- Try not to use excessive force. If your poor little Petpet slams into a wall too hard it can get knocked-out. This will cause it to completely stop.
- Watch for currents in the water that can push your Petpet off-course. The currents can be found by watching the little white dots on the level. Whatever direction the float in is the way the current is moving. The current isn’t really a big deal until you’re in the last 4 levels with the Bubblebee.
- If after popping a bubble a whirlpool appears, swim into it! This will bring you to a bonus level. Click here to read more about bonus levels and how to unlock them.
- In Zen Mode: Neopoints can’t be earned, levels can’t be unlocked and you may only play in levels you’ve played in Regular Mode. On the up side, you get unlimited shots. Zen mode is great for practicing.
Characters
| Players | Obstacles | ||
 | Marafin Levels 1 – 4 The Marafin player isn’t very noteworthy and has no definitive movement traits. |  | Arkmite Levels 6, 10 & 12 Arkmites swim back and forth along a line as if on patrol. Simply avoid bumping into them. |
 | Mundo Levels 5 – 8 The Mundo player moves a little bit slower than the Marafin, but overall they are very similar. |  | Brown Ghoti Levels 5, 7, 10 & 11 Ghotis can get in the way easily. They swim in lines and bounce off at whatever angle. They can end up anywhere. Just wait for them to move. |
 | Bubblebee Levels 9 – 12 Perhaps the most useful player. The Bubblebee will swim a bit further even after he has stopped moving. |  | Darpinch Levels 8, 9, 10 & 11 Mischievious little buggers that burrow under the sand and then pop up randomly. Observe the timing of their actions and they’ll be no worry. |
Points
I’ve been informed that there is a set amount for each level in a certain amount of shots. Additionally 4 points are added for every blue bubble that is popped. If your bonus points differ slightly from the chart below, that is why. Keep in mind, this chart is a roughly the bonus points you can earn. It is not precise or exact.
| Bonus Points | ||||
| Shot 1 | Shot 2 | Shot 3 | Shot 4 | |
| Level 1 | 36 | 9 | 0 | 0 |
| Level 2 | 74 | 17 | 0 | 0 |
| Level 3 | 63 | 33 | 0 | 0 |
| Level 4 | ? | 13 | 0 | 0 |
| Level 5 | ? | 29 | 0 | 0 |
| Level 6 | 74 | 18 | 0 | 0 |
| Level 7 | 176 | 44 | 0 | 0 |
| Level 8 | ? | ? | 0 | 0 |
| Level 9 | ? | 53 | 0 | 0 |
| Level 10 | 146 | ? | 0 | 0 |
| Level 11 | ? | 32 | ? | ? |
| Level 12 | ? | 23 | 0 | 0 |
About Bonus Levels
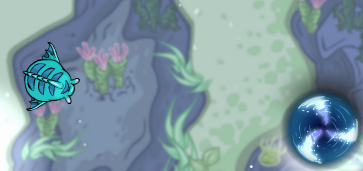
So you want to know what these “bonus levels” are all about? Well, levels 4, 8, and 12 contains one bubble that creates a whirlpool when popped. Go into the whirlpool after you collect as many shells as possible WITHOUT completing the level. Accessing a bonus level will advance you to the next level and you want all the points you can get from the accessing level.
You only have one shot to collect as many shells as you can. Then you proceed to the next level. You can score over 100 points on each bonus level which is VERY useful to get your score higher.
Another important thing to know about bonus levels are that they can only be accessed when you have beaten one of the 3 previous levels in one shot. For example, you would have to beat level 5, 6, and/or 7 in one shot to access the bonus level on level 8. 1 – 2 – 3 – 4 – 5 – 6 – 7 – 8 – 9 – 10 – 11 – 12Bonus Levels
1 – 2 – 3
There are just a few things left to tell you before we get to the level guides… That is, how to use the level guide! On each map you’ll find a red dot with a number next to it. The number is the shot number and the red dot is where to aim. Keep in mind, the red dot IS NOT ALWAYS where you mouse will be, but the middle line of the arrow in the game should pass through where the red dot is marked. Your pointer may be outside of the screenshots below, so you can use the most force possible where necessary.
Level 1
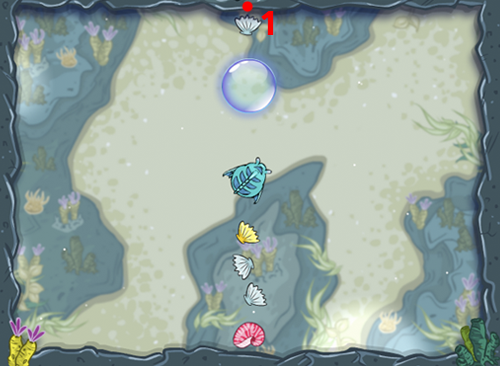
Shot 1: This level should take only one shot. Aim full force directly into the bubble. The Marafin will bounce off the bubble, popping it, then collect the bottom shells. It will bounce off the bottom wall and float into the last shell. Easy enough, right?
Level 2
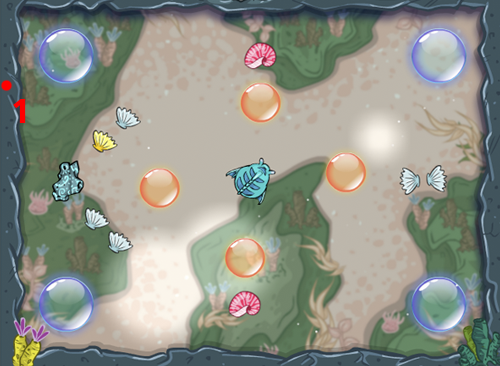
Shot 1: With some practice this should be your only shot. Aim just below the bubble in the top left with full force. The Marafin will bounce down collect the No Friction Powerup and the shells. From there, if aimed properly, the Marafin should bounce around the level is a circle effectively collecting the rest of the shells.
Shot 2+: If you need these shots, just use your best judgment to collect whatever shells are left.
Level 3
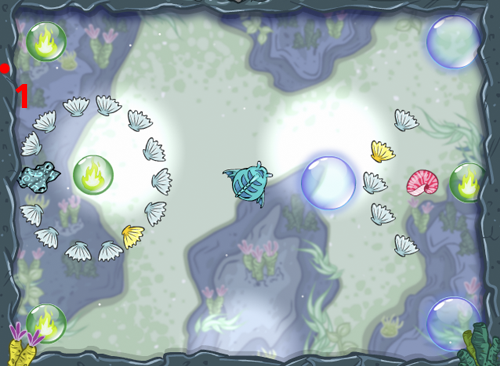
Shot 1: On this level, similar aiming will be used. Aim below the bubble in the top left corner. The Marafin should collect some shells in the circle before hitting the bubble. It should then bounce off the bubble collecting the Powerup and the rest of the shells. The Marafin should bounce off the bottom, then the top effectively avoiding the bubble toward the middle. Then it should collect the final shells on the right.
Shot 2+: If needed, use these shots to follow a similar path as describes above.
Level 4
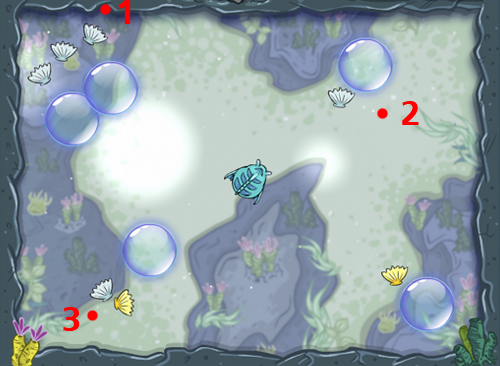
Shot 1: I always aim full force to get the Marafin behind the bubble in the top left. Make a point to pop them both just in case our bonus level is hiding there.
Shot 2: Use this shot to collect the shell by the bubble in the top right. Bounce off the bubble to hit the one in the bottom right and collect the shell.
Shot 3: The final shot should be used to collect the final two shells in the bottom left if needed.
Hopefully you unlocked the bonus level and you get to wrack up some extra points.
Bonus Level 1
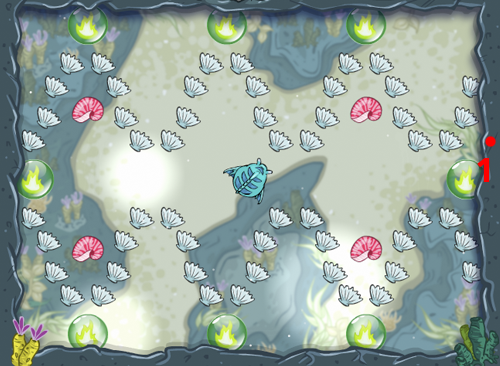
Shot 1: This is your only shot, use it wisely. I suggest aiming full force just above the bubble on the right. The force and boost should bounce you up to collect some shells, boost shells and hit some boost bubble. Good luck!
Level 5
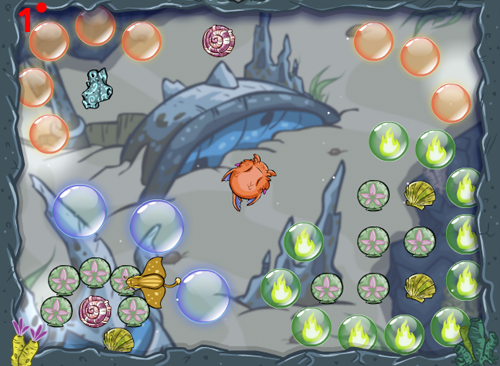
Shot 1:Don’t be intimidated! This is our first busy level with obstacles. Use shot one to aim full force just to the right of the No Friction Powerup. From here, you’ll bounce like crazy and there isn’t much telling you what you’ll collect.
Shot 2+: Use your remaining shots to collect whatever is left behind. Be sure to watch out for that Ghoti.
Level 6
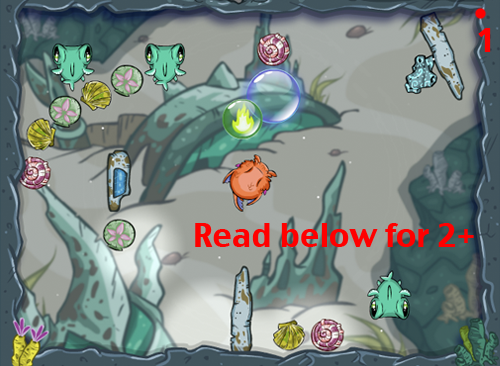
Shot 1: For the first shot, aim just above to No Friction Powerup. Use full force and be sure to go when the Arkmite on the right is halfway up the screen. You should collect the Powerup, the shell in the middle and then proceed to bounce some where near the bottom two shells.
Shot 2+: Use your remaining shots to collect whatever is left. Be sure to aim wisely and take your time planning your shots around the Arkmites.
Level 7
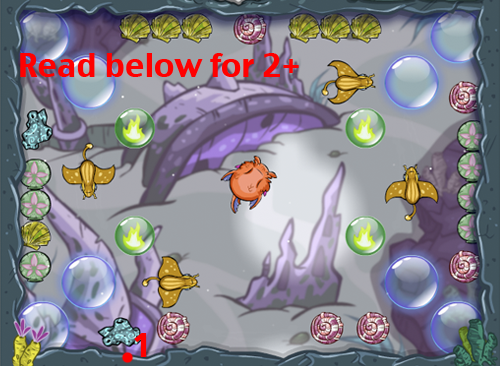
Shot 1: This level is difficult because it is very random. My suggestion is to aim full force, as always on the first shot, for the little space between the No Friction Powerup and the booster shell in the bottom left. Do this when the Ghoti in that area is swimming to the right.
Shot 2+: I really wish I could offer you more advice, but I struggle with this level. You have 3 more shots. Use them wisely, avoid the Ghotis and plan your boosts/Powerups well.
Level 8
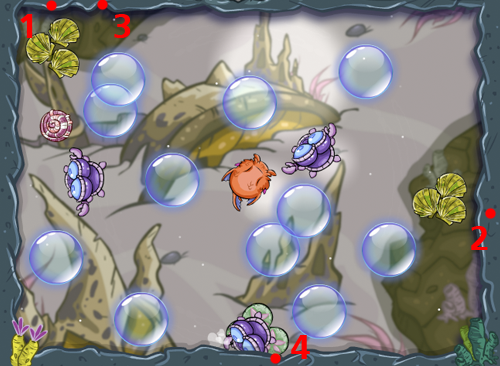
Shot 1: This levels looks easy, right? Think again. We’re on level 8 now! You will use at least three shots here. For the first shot, aim full force to the top left. The point is to pop all four bubble in that area while keep the Mundo roughly in that area. Try not to bounce him out too far. Remember to avoid those pesky Darpinches.
Shot 2:What are we doing? We haven’t collected any shells!” I know. I know. Just wait. From here, we want to aim to collect with shell in the bottom right without getting ourselves stuck behind a bubble.
Shot 3: Use the third shot to to bounce off the top wall to collect the shells in the top left along with the boost. If your angles are good, the boost might lead you to collect the final shells.
Shot 4: If not, use your final shot to get those shells at the bottom of the level.
Oh wait! We unlocked a bonus level? Congratulations!
Bonus Level 2
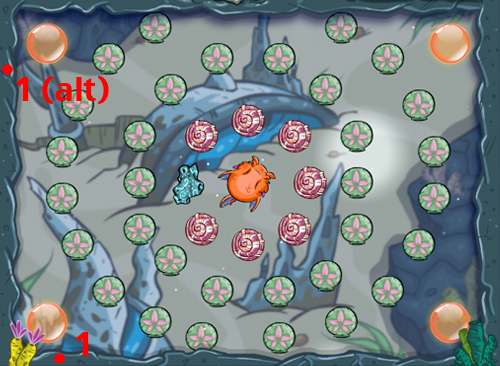
Shot 1: Yay, bonus level! Remember, you only get one shot! Aim full force just to the right of the orange bubble in the bottom left. You’ll collect the No Friction Powerup and bounce from there.
Shot 1(alt): Aim full force just below the orange bubble in the top left. You’ll collect the No Friction Powerup and bounce from there.
Level 9
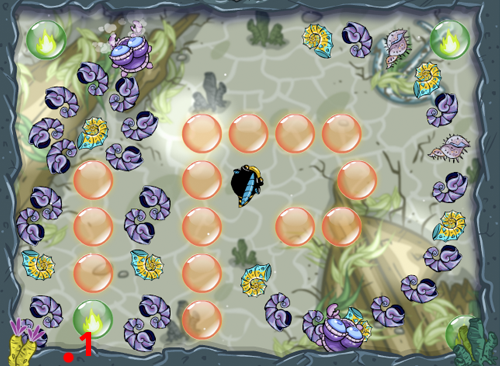
Shot 1: This level looks more difficult than it is. Just follow these directions very closely. Aim full force so your arrow passes through the exact middle of the bubble to the left and down one of where you start. If the current is going to the left this should be your only shot.
Shot 2+: If it doesn’t work out just right, use your remaining shots wisely to collect everything else while avoid the Darpinches.
Level 10
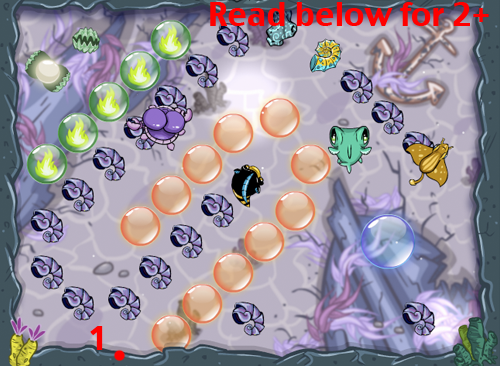
Shot 1: This level is tricky because of the clams that you must collect. Aim to just barely in the orange bubble at the lowest point of the level. You’ll bounce and begin to hit the green bubbles.
Shot 2: Use this shot to get through those green bubbles and collect the clams.
Shot 3+: Each clam gave you one extra shot. You’ve made it this far in the game and you have 4 shots left to collect a handful of shells. you should be able to handle it from wherever you landed.
Level 11
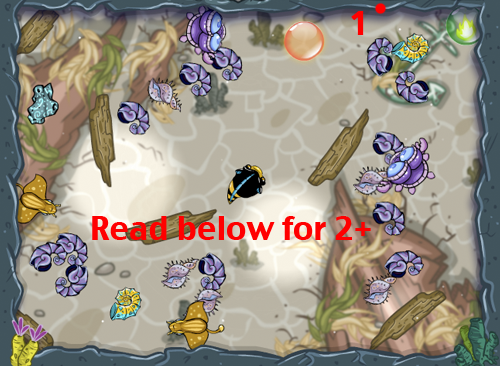
Shot 1: Aim full force to the right of the orange bubble to your top right. Don’t aim to hit the bubble though, just come close to it. You’ll spiral around the level and end up somewhere after the No Friction Powerup.
Shot 2: Use this shot to collect whatever it left in the middle of the spiral.
Level 12
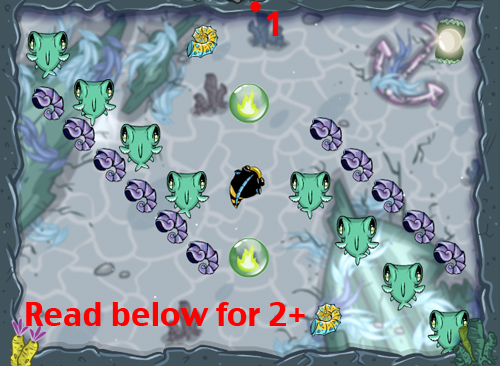
Shot 1: Aim up with full force. You want the middle of your arrow to be the tiniest bit to the right of the center of the green bubble above you. The goal is to get one of the green bubbles popped just in case you’re eligible for the last bonus level and to collect the majority of the shell to the right. If you’re not eligible for a bonus level, still use this method.
Shot 2+: Use your remaining shots to collect whatever is left. If you’re on level 12, you can surely take care of this on your own.
Bonus Level 3
I current do not have a screenshot of this level available.
Check back another time.
Shot 1: This bonus level can be very tricky to unlock, but if you get here, congratulations! You’ve got yourself a good score racked up by now. In this level aim your one and only shot just above the booster shell in the bottom right. The goal is to collect the No Friction Powerup and the boost shell in the bottom right. From there… You’ll bounce a lot just like the other bonus levels.
